Tuesday, December 13, 2011

Tasty Flaky Biscuits

I modified this recipe from my favorite fresh biscuit recipe into a food storage hunger fighter.  This tasty recipe should be a comfort food staple in any food storage program.  They bake up as soft and lofty as the fresh variety.  I know, because I made a batch with food storage and with fresh ingredients in the same night.  My family actually preferred the golden color and taste of the food storage biscuit over the fresh counterpart.  Quite a testament to the tastiness of this wonderful recipe.


BISCUIT
3 c. Flour
1 Tbs Baking Powder
1 Tbs Sugar
3/4 tsp Cream of Tarter
1 tsp Salt
1 Tbs Whole Egg
1/4 c. Butter Powder
8 tsp Milk Powder
1 c. Water.

Mix dry ingredients together.  Create a small well in the center and pour in the 1 c. water.  Mix and knead until evenly moist. 

Place on lightly floured surface and fold over kneading lightly about 6 times.  Press to 1/2 thick and cut with a large circle cutter.  One batch makes about 6 large biscuits.

Bake on greased cookie sheet, 450ยบ for about 10 minutes or until golden colored and done.


Sunday, November 13, 2011

Potato Dill Soup

I found this original recipe in a girlfriend's cute little cook book.  I modified it to be food storage worthy, and it is amazing.
The original recipe is from Lemon Poppy Cake and this recipe is here.  If you would like to check it out, she has some recipes available on her page and all the books available to purchase.  There are many wonderful recipes in these books and I would recommend having a look and buying some, but I digress.  Back to Potato Dill.


Potato Dill Soup
6 c. Chicken Broth (can use water and bouillon)
7 oz or 4 c. Dry Potato Slices
1/4 c. Dry Onion
2 tsp Dill Weed
2 tsp Basil
1/4 tsp Salt
1/4 tsp Pepper
1/2 c. Gravy Mix
2 c. Water

Add the gravy mix and water and chicken broth, whisking together till smooth.  Throw in the Potato Slices and spices and cook until potatoes are tender and soup is the consistency desired.

I made mine in a crock pot, cooked on high for about 3 hours then turned down to keep warm until dinner.  At one point, it cooked down too far and so I added more water.  No big deal.

She says to blend it, but I just broke up the slices with the spoon and it was delicious.

Some of my family liked a little more flavor, adding garlic or tobasco or cayenne.  I liked it just as it was, with just a little extra salt.
Soup in crock pot, just before serving.  If you
stir it, there is a small layer of broth floating
on the surface of a very hearty potato soup.


Dry Potato Slices


Saturday, October 15, 2011

Tomato Soup

I made homemade tomato soup with my crushed tomatoes.  One year, I lost all my tomato starts due to a late freeze and having been busy and not putting the wall-o-water up yet.  So we bought plants at the local Walmart, and they were ALL grape tomatoes.  Go figure.

Obviously they were not useful or practical to can whole tomatoes, so that year all we made was crushed tomatoes (blended with skins on) and salsa (also with skins on).  Crushed tomatoes are easy to use, but I do not like them as much as whole tomatoes.  I usually dice my whole tomatoes before adding them to any recipe, but whole tomatoes can be cut in half, thirds or fourths (useful in hearty soups or bean and pasta salads) or smashed (for soup bases or sauces or 'fresh' salsa).  Crushed tomatoes are just smashed...no options.  Period.

Back to tomato soup.  This is the BEST EVER soup.  It is thick and hearty with a texture you can almost sink your teeth into.  It makes a meal, not a broth to go with a sandwich like the canned soups.  Unfortunately, since it was an experiment, I did not take pictures.  I figured I would have to make it a few times to get it just right.  I figured wrong.  By the time I realized it, everyone had gobbled it all up.  There was barely one bowl left over for the hubby to take for lunch the next day along with the baked on ring you get in the pot you make it in.  Not very picture worthy. 

I promise to make it again soon and add pictures at that time.  Until then, the recipe is too good to make you wait.

Tomato Soup

2 pints (4 c.) crushed tomatoes
6 c. Water
1 Tbs Celery, dry
2 Tbs Onion, dry
1 tsp Parsley
1/8 tsp Lemon Pepper
1/8 tsp Pepper
1 tsp Sugar
1 tsp Basil
1/4 c. Tomato Powder


Mix together in pot and cook until warmed through and thickened to desired texture.

(I prepped in advance and let it simmer, stirring occasionally, for 3 hours.  I of course had to add a little extra water because of the length of time.)

This would make a GREAT crock pot soup.  If you like your soup a little less tomato with a little more cream..... remove the 1/4 c. tomato powder.

Saturday, October 8, 2011

A Chicken Rice-A-Roni Knock Off

I love rice a roni, but not so much the price.  It is just pasta, rice and seasoning after all and I do buy all my spices in bulk, so I searched far and wide and after much trial and error in different recipes, I came up with this.

Chicken Rice a Roni

2/3 c. White Rice
1/3 c. Pasta
(pasta can be broken spaghetti, vermicelli or acini de pepe)*
2 Tbs butter
4 Tbs Seasoning
2 1/4 c. Water

Saute Rice and Pasta in Butter until pasta darkens.  Add seasoning and water.  Stir to mix, then cover and simmer until rice is tender.  Equals about 1 box.

I do not recommend brown rice unless is is parboiled or something.  The brown rice always seems to never quite cook all the way and be very hard or at best chewy.  You can play with this and see what you come up with, but I've not made it work yet.

* Spaghetti will darken, vermicelli or acini de pepe will brown.  Basically you want the pasta to absorb the browned butter flavor.  It really adds to the finished product.

Chicken Rice A Roni Seasoning

1/4 c. Parsley
6 Tbs Chicken Bouillon**
2 tsp Onion Powder
1/2 tsp Garlic Powder
1/4 tsp Thyme

Mix and keep in airtight container.

**Be careful to use a high quality, low sodium bouillon or else this will be very very disgustingly salty!

Sunday, September 18, 2011

Dressed for Canning Success

When starting a canning project, the best way to make it a productive and pleasant experience is to be ready for it.  Like making dinner is harder in a dirty kitchen with no clean pots and pans ....  canning will be as easy as you prepare for it to be.

I can outside most of the time.  It is much more pleasant, I can watch the kids play and I don't heat up the house.  When I blanch, tomatoes and peaches, I set up like an assembly line.


I set up my camp chef and my table so I can stand or sit in one spot and easily reach the produce to put in the hot water, remove the produce to the cold water, peel into the bucket on the ground and place blanched, peeled produce in my clean pot.

Once this is done, I leave the table up and process my jars of produce.  I then set them to cool on a towel on the table.  I know people say the wind can break your jars ...  and I live in a very windy place ... but in four years of canning this way, I have never broken a jar from the wind.  I would say it never hurts to try and if the wind is a problem for you, then simply walk the jars into the house rather than letting them cool outside.


Sorry for the glare ...  can't control the sun!


The camp chef can also handle two canners at a time.  There's not quite enough room for three, but the middle burner is a good place to put a pot of canning liquid (water or syrup) to stay warm without heating the house!

Saturday, September 17, 2011

Donut Glaze

Glaze on Sweet, Whole Wheat Cinnamon Bread

DONUT GLAZE
2 c. Powder Sugar
2 Tbs butter powder
1 tsp Vanilla Powder
1/2 tsp Almond Powder
6 Tbs Water


This makes a wonderful glaze, perfect for donuts, sweet rolls and cakes.  You can add other flavors or omit the almond to make it the flavor you are looking for.

Saturday, September 10, 2011

Corn

We are very blessed.  On Saturday I was canning tomatoes.  Tomatoes out my ears.  In the middle of my first batch, my Mr got a phone call from his son asking if we wanted corn.  Apparently there is a farmer, who's kid planted a few acres for FFA and they were going to disc it under now that her project was complete.  The corn was free for the taking, as much as we wanted.

I felt my body slump in anticipation of the future fatigue as I said "Of course we want it dear.  How long do we have to get it?"

The answer came back, that it was to be plowed tonight.  So 30 minutes later (that's how long was left on the tomato batch) my Mr and I headed out for corn.  Oh did we get it too.


Looking at the pictures now, and knowing how much there was, it is hard to feel the pictures do it justice.  To explain, we got through ONE of the totes, and the box.  We put away 3lbs in the dehydrator, 24 lbs in the freezer and 24 pints in the canner.


We didn't finish the corn until Sunday evening.  If I never see another kernal of corn again, it would be too soon.  We ended up giving away the other tote, and the buckets away in bag fulls to the neighbors.

I am slowly putting all the frozen corn through the dehydrator.  I did not have the jar space to can it all and neither did I have the desire to spend that kind of time.  I had to get cleaned up so I could go back to work the next day.

It is amazing how little time it took to shuck and clean and cut the corn off the cob.  We ended up with about 50 lbs of perserved corn.  The frozen/dehydrated corn needed to be blanched, but we did that by the 1lb batch in the steamer basket.  The corn in the jars did not require blanching.

Post Update:
I have reconstituted the dehydrated corn and eaten it.  I am so excited because I always thought it was only good for soups or casseroles; but it's great to eat as a side dish!!!  Reconstitute, add butter, salt and pepper then eat just like fresh corn.  Amazing!!

Wednesday, August 31, 2011

Canning V. Slicing Tomatoes

I grow mostly roma's.  A great canning and paste tomato.  I also grow a few slicing/beefsteak tomatoes for the fresh eating.  On canning day, they all go into jars.  Just to explain the differences between the two types and why you want to grow canning tomatoes for canning and not just grow slicing tomatoes.

If you look at my post on canned tomatoes, I show a lot of pictures demonstrating the process of blanching and peeling.  What I didn't show you  was the extra steps I had to do for the slicing tomatoes.  Due to the shape of the tomato and the shoulders (the rounded part by the stem), I had to core the tomato before I blanched them.


The red ones are Pantano Romanesco and the deep red/purple ones are Cherokee Purple.


Can you see the splits in the shoulders?  A common problem in a slicing tomato, they make it harder to peel even after blanching.  They act just like a blemish and have to be cut around.

Due to the size of the tomatoes, they have to be halved or fourthed before they can go into the jars. 

These two varieties did hold up well, just so much more work.


Left is Pantano Romanesco, Middle is Roma, Right is Cherokee Purple

 This also demonstrates two other points.

1. A definite need to label what is in the jar.  I usually label 'Tom 8-11' but in this case, I didn't want to think the purple or romanesco tomatoes were bad in 6 months because they are a different hue.  I labeled them what they are because they are different from what I normally bottle as tomatoes.

2. There is space saving features in using the roma/paste style tomatoes over beef steak.  The amount of unused space in the bottom of the jars is far greater in the beefsteak/slicing type tomatoes.

Monday, August 29, 2011

Italian Pasta Salad

My amazing husband came up with this simple pasta recipe.  It is delish and a fabulous way to use food storage and fresh produce together.  Zesty and sweet, rolled into one.

This makes a great side dish or an easy lunch for a warm summer day.  When you don't want to heat the whole house up in the evening, simply cook the pasta in the morning or late the night before!

ITALIAN PASTA SALAD
2 c. Pasta, cooked and drained
1 1/2 md Carrot, shredded
1/2 Tomato, diced
1/2 Cucumber, diced
1/4 c. Italian Dressing

Mix all ingredients in bowl.  Chill until time to serve.


Saturday, August 27, 2011

Food Storage Extenders

My collections of 'food storage' recipes often include recipes that combine dried or long term products like beans and rice with shorter term items like fresh produce.  I expect to either be able to garden or collect from the wild various edibles to compliment my food storage meals.

I consider my garden an extension of my food storage.  I feel a well rounded long term food storage is more sustainable than just a few buckets of grains that I am going to grind into flour or cook into soup.

In order for that expectation to be a reality, I have to learn a lot about how to grow, find, and use the fresh produce that is available.  I have to focus on learning how to consume or preserve each item while it is in season, as each season is far shorter than our moderns lives and grocery stores lead us to believe.

You really need to get 'back to basics' with this method of feeding your family.

I would encourage you to learn about wild and unusual edibles in your area.  Learn to grow a garden.  Use only open pollinated and non GMO seeds.  Realize that in a time of desperation, whether it is caused by an ailing economy, loss of job or a natural disaster ... you may not have access to your vast storerooms of carefully preserved food.  You may not have access to commercially produced products to replenish your storerooms when they run low. 
When your storerooms are unavailable or running low and you need to find ways to extend the little food you have and preserve the lives of those you love, knowledge of gardening and gathering wild edibles will be invaluable and irreplaceable in your endeavors.

A few major pointers in gardening. 

Get out and do it.
Whether you garden a substantial amount or a few pots on the porch.  Do it.  There are so many things to learn like when do I put it in the ground, how much water does it need, when is it ripe to pick it, how much does one plant provide, what do the yellow leaves mean ....  things that are hard to learn from a book without the reinforcement of the actual experience.

Don't get stuck on "heirloom" and don't be satisfied with grocery store seed packets.
There is a happy medium between buying expensive heirloom and low quality grocery store seed.  What you want to search for is OPEN POLLINATION.  Heirloom isn't always the best, and what is in your local grocery or gardening center is not the best either.  Heirloom is simply old open pollinated plants.  It doesn't mean that something newer isn't better.  What you want to stay away from is anything that is hybridized in a laboratory or is GMO.  Anytime a man thinks he knows more or better than God in creating your food .... stay away.  The reason for this is simple, it isn't natural (check this out, or this one) and often does not reproduce true to type from the seed of the produce you eat.  You want seed that will reproduce, true to type, year after year after year.  Whether you get that from a $1.25 grocery store packet or pay $4.00 on a specialty website it doesn't matter.  Just get it.  Natural hybridization (crossing two plants in a garden on purpose or selective seed saving for desired characteristics) is just fine once it is stabilized (proven to grow true type).  Hybrid is not always bad if it is done naturally.  It's how disease and pest resistance is naturally improved (I guess evolutions is real after all !!) in the tasty, wonderful, older varieties of plants.

Start gardening small.
Don't decide tomorrow that you will have a 1/4 acre garden if you have never done it before.  Start small so that you don't overwhelm yourself.  Grow something that you will eat that is easy ... (beans, cucumbers, tomatoes etc...) and grow something you really want, even if it's a little harder.  This way you are excited for the items you really want and you are satisfied with your work because you are almost guaranteed a crop with the easy item.  Once you master something, move on to a new product. 

Keep it fun and challenging for you.
Every year I like to plant something that I have never grown before.  I only plant one or two or 1 square foot ... but in this way I get to try eating new things, learn more about gardening, and increase my gardening confidence.  It also helps to keep things fun!  The majority of my garden is tomatoes, my staple crop, (lots of work canning) and a few melons (yum!) and cucumbers (more work canning).  Boring.  So I planted eggplant and celery.  The celery bombed ...  the eggplant rocked.  I will likely try celery again next year in a different spot because now it is a challenge, but will only grow the eggplant again if I enjoy eating it fresh this year. 

Good luck and I hope you get out and garden!!

Friday, August 26, 2011

Tomatoes

I am always so happy when my tomatoes start getting ripe!  It means that I can get started on the biggest crop my garden provides me with.

Yes.  There are cucumbers again too.  :)

We eat fresh the firstlings .... then we get to canning!  This small batch of tomatoes will only provide me with a few canners full. 

I got 16 quarts out of this sink full. 

In case you have never canned tomatoes before, I have taken pictures of the different steps to help you along.

You do not need to wash the tomatoes, I only rinse them, so the grass, leaves, petals and other pieces that are not attached get rinsed off.  You don't actually even need to do that.

Once your tomatoes are gathered up, you need to BLANCH them.  This is a process where you place the tomatoes in boiling hot water and then remove them to cold water so the skins will come off.


Typically the skins will start to split, and a small amount of pressure will cause them to 'slip' off.  Sometimes you need to use a knife to get it started, or to lift the skin from the flesh of the tomato and peel it.  You should never have to cut the skins off, except at the stem and if there are any blemishes you may have to cut right around the blemish.  If you are cutting more than that, you need to boil them just a little longer.


Once the tomatoes are blanched and peeled, you simply pack them in the jars following the wonderful instructions in your canning book.  The book I own is the Ball Blue Book of Preserving, but since it looks like that is an old version, I would simply recommend getting any Ball Blue Book at a reasonable price.  It is a wonderful quick reference.  It has just enough detail, not so little you are lost and not so much you are overwhelmed.  Great for beginners!

One last tip for blanching.  The temperature of the water, the time in the hot water and the ripeness of the tomato all play a part in the finished product.


The first tomato is very ripe.  The second tomato is barely ripe.  They were blanched at a lower temperature than the third barely ripe and the fourth very ripe tomato.  Can you see the texture difference?  The two on the left are very firm and the two on the right are almost mushy.  Both are good for canning, but the ones on the left will be prettier.

Thursday, August 25, 2011

Yogurt

Did you know yogurt is easy to make at home?  Did you know you can make it with your food storage dry milk??

I am so excited to share this post with you!  I have just made yogurt out of dry milk!
It was so easy, It took a few hours of intermittent attention and then a bunch of hours just sitting incubating. 

I think you will love it as much as I do!

YOGURT
1 c. Nonfat Instant Milk Powder (DO NOT use a milk substitute like morning moo)
4 c. Hot Water
2-3 Tbs Plain Yogurt (or use a dry yogurt starter and follow those directions)

Mix the 1 c. Milk Powder with hot water in a quart size jar.  Fill it half way and mix, (I put a lid on and shake it) then fill it up to the bottom of the neck.


Place this jar into a pot of boiling water with a towel or canning rack on the bottom to prevent the jar from breaking, like a double boiler.
Using a meat or candy thermometer, heat the milk to 180ยบ F.  Remove from heat and allow to cool to 115ยบ.  (It takes about 1 hour each to heat and then cool the milk)


Place the 2-3 Tbs Yogurt in a bowl.  Pour in a small amount of the cooled milk and stir until it is smooth.  Pour this mixture into the jar and stir.

Wait 10 minutes and stir again.  Place the lid on the jar and place in a small insulated bag (lunch bag or small ice chest).  I added 2 more qt jars of hot tap water to help maintain the temperature.  Pack the extra space with towels, making sure the 3 jars are touching.  Seal. 


My bag was very thin, and I had a small insulated bag that was slightly larger so I placed one bag inside the other.  The goal is to maintain a good temperature for the growth of the culture which is how the yogurt sets. 

Allow to incubate until it is set, about 8 hours.  I simply left mine over night.  In the morning it was set.  When set, place in the fridge.  It will keep for 1-2 weeks.


There was a small amount of yellowish liquid on the top of the yogurt.  This is whey, healthy and very high in protein content.  I stirred it into my yogurt, but you can pour it off if you prefer.

Flavor with jelly, fruit, granola, extracts or oils.  Use it plain as a sour cream or mayo substitute in recipes.  Make smoothies or fruit dips. 


Home made yogurt is slightly 'softer' than storebought yogurt.  There is frequently added pectin and other thickeners in storebought yogurt which you do not add to your home made stuff.  It is purely milk and cultures.

It's a great way to save a little money and use your food storage so that it doesn't go bad!

Wednesday, August 24, 2011

Grapes and Wasp

I love my grape vines.  I planted them about 4-5 years ago, moved them about 3 years ago, lost one of my two vines and finally got a crop.  Yeah!  It was only 3 bunches and I had to save them from the wasps that were eating them, but they are sooooo yummy!


We did find the wasp nest in a neighbors tree ......  We were wondering why they hadn't tried to build in the eaves of the house like the last 3 years.  I guess they found a more suitable spot, a hiding spot of sorts. 


We found 'em!!

Tuesday, August 23, 2011

Mac and Cheese Varieties

After figuring out the best mac and cheese recipe ever, I decided I need to post some of the different ways that I enjoy eating mac and cheese!

MAC AND CHEESE
A more grown up taste ...

1 Tbs dry Bell Pepper Blend
1 Tbs dry Onion

Reconstitute peper and onion, add to one recipe or one box mix of mac and cheese.


MAC AND CHEESE DINNER

1 Tbs dry Bell Pepper Blend
1 Tbs dry Onion
1 1/2 tsp Garlic powder
1/2 pint Beef w/broth

Shred Beef if it is not ground.  Add garlic, peppers and onions.  Mix all together and warm until peppers and onions are soft.  Add to one recipe or one box mix of mac and cheese.

Sunday, August 21, 2011

Zucchini Pasta

Right now I have a major abundance of zucchini coming from my garden.  My favorite thing to do, other than dehydrating it, is to mix it with pasta and sausage in the best dinner ever.
I got this recipe originally from Your Home Based Mom then I changed it up a little to suite my style.  :)  She calls it Lite Pasta, but I don't think it's very 'lite'.  :)

ZUCCHINI PASTA
16 oz Spaghetti Pasta, cooked and kept warm
32 oz Kielbasa Sausage, sliced
1 Red Bell Pepper, cubed
1 Onion, sliced
2 tsp Basil
2 tsp Garlic
2 tsp Chicken Bouillon
1 small Zucchini cut into approx. 1/2 x 2" sticks
1 can Olives, drained

Brown sliced sausage in pan.  Remove from pan and saute Onion and Pepper.  Add olive oil if there is not enough left from sausage.
Add Basil, Garlic, Bouillon and Zucchini.  Cook until Zucchini is tender.
Toss vegetable blend, sausage and olives with pasta.

My husband likes it with a little cayenne on it.

Thursday, August 18, 2011

Cucumbers and Carrots and Green Beans ... Oh My!!


So.  My garden is determined to kick my butt this year.  Carrots are having a slow start, but the cucumbers and squash are in full swing and the green beans are coming to a close.

It's not the first canning I have done this year ....  but man, it was the most in one day!
27 pints of pickles
3 qts of pickles
9 pints of green beans
1 pint of carrots (thank goodness they process the same as green beans!)
16 half pints of chicken

There is enough chicken prepared to put up maybe 24 more half pints, but I am out of energy for the day.  It will have to wait until tomorrow.


I am most excited for the pickles.  I bought a new book, "You Can Can"  I wouldn't recommend it instead of the Ball Blue Book, but it has some different recipes in it which can be fun.  We made dill, with dill fresh from the garden and dill from a store bought packet.  We also made sweet and spicy dill and bread and butter chips.  1 qt of whole dill and 2 qts of spears. 

Thanks to the invention of the mandolin slicer and the discount store selling one for $12, my chips are all perfectly sliced.  Literally. 

Now, I am exhausted. 

Peace Out Folks.

Monday, August 15, 2011

Macaroni with Cheese Sauce

I love that old stand by Mac and Cheese.  It is one of those cheap and tasty comfort foods from when I was a kid.  Making it with food storage is not quite as simple, and at the same time easier than I imagined.  I struggled with this for quite a while, but have finally figured it out.  Here is the pure food storage recipe ...  just cheese blend and pasta.


MACARONI AND CHEESE
Equals one box of Mac and Cheese

1 1/2 c. Pasta
2 1/2 c. Water

6 Tbs Cheese Blend Powder
1/2 c. Water
1/8 tsp Salt
1/8 tsp Pepper

Cook the pasta in the water.  If you use a lid on your pot, there will be plenty of water left over.  Drain, reserving water.

Blend the Cheese Powder into 1/2 c. water and mix into pasta.  Add more water to the desired texture.

The trick, is to mix it well BEFORE you add it to the pasta.  After the pasta is in the mix, any lumps are there to stay.


MAC AND CHEESE BOX
Making a box mix food storage style

1 box Mac and Cheese
2 Tbs Dry Milk
3 Tbs Dry butter
1/8 tsp Salt
1/8 tsp Pepper
2 1/2 c. Water

Cook pasta in water.  If you use a lid, there will be plenty to cook and plenty left over.

Mix contents of cheese packet with dry milk and dry butter.

Drain pasta, reserving water.  Mix cheese mixture into pasta adding 1/4 c. water.  Add more water to desired texture.


Dry Dairy 101
I don't know how many botched batches of mac and cheese I threw away before I realized the difference between the packet powders and what I have in the #10 can.  To help prevent ya'll from having the same problem in this and other recipes, here is what I learned:

Cheese Blend: A blend of cheees and dairy products like milk or whey.  This is what comes in most #10 cans for food storage.  This is why you can get away without adding any milk or butter into this recipe.

Cheese Powder: The orange stuff in the mac and cheese packet.  No additional dairy products, which is why you need to add milk and butter to the box mix.


On the Left is CHEESE BLEND from a can.  On the Right is a CHEESE PACKET with the added MILK and BUTTER.


Saturday, August 13, 2011

Cherries !!!

I DID NOT GROW THESE beautiful tasty cherries.  I wish I had a tree, but unfortunately we do not.  A kind co-worker offered to let us finish cleaning off his tree and I swear we got a couple hundred dollars worth off the tree.  I am so into planting a cherry tree now.  :)


I do not know how many pounds we picked, I just know it was a lot and after all my canning efforts, we still had 11 lbs for fresh eating!

23 quarts.  Makes my food storage happy!  Yummy yummy!!

Friday, August 12, 2011

My Garden

I have a tiny tiny lot.  I suppose it is large compared to someobdy in a town home or condo ...  but for a stand alone house, it's small.  Not even 1/5 of an acre and the house is huge at 3600 sq ft.  So if you can imagine, there is not much yard left.

Some people think I have such a huge garden, but the fact is ....it is only 240 sq feet.  It is only even that big, this year after we put in 2 more beds.  We have 6 4x8 beds and 3 2x8 beds.  In this space I have been able to grow 19 tomato plants (we lost one), 1 bell pepper, 32 ft of beets, 56 ft of carrots, 40 ft of bush beans (if you compared it to row plantings), 1 watermelon vine, 3 cucumber vines, 2 zucchini, 1 yellow crook neck and 2 smaller melon vines like honey dew.  In my beds I have also added the permanent plants of lavendar, dill, Rhubarb, pot marigold and chives...I think I may have to replant the chives.

I have some border beds...what others use as flower beds, and in them I have planted various herbs and edibles.  I have mint, marjoram, poppy, thyme, and pineapple sage.  We have a planting of raspberries above a retaining wall and a grape vine that frames a window.  We have planted peach, apple and choke cherry trees.  I have plans to plant more herbs and edibles.

My point in this posting is ...  no matter the size of your yard or garden.  You can grow SOMETHING.  Only have a small decorative flower bed??  Thyme is a beautiful plant which produces green or green/yellow foliage and purple flowers.  Mint, Sage and Chives are just green foliage and if you interplant them with flowering bulbs for color can make a low maintenance and beautiful border or bed.

South facing window?  Hang a pot w/ cherry tomatoes.  Small patio or porch?  Plant stands with anything can be nice.  Cucumbers and tomatoes can make good container vines while peppers and eggplant and almost any herb make pretty upright plants.


Don't judge me.  I was too lazy to roll up the hose for the picture.  :)  We have the auto water system working now so no more hose except when starting new seeds.


I love my poppies.  They grew and bloomed!  Last year, they grew and died.  :)   This bed is about 2 feet deep and runs the length of my front porch.  I have room for a few bush/trees here and plan on planting currant bushes.  The poppies are planted to border the currant bushes I will plant next spring.  I love red flowers, they are my FAVORITE!

Monday, August 1, 2011

Mexican Chicken

So I got this recipe at church ..... I don't even know how long ago.  I finally decided to make it last sunday, only to realize that ....between the time church gets out and my hubby leaves for his evening meetings  I DID NOT have 2 1/2 hours like the recipe called for.  I was about to set it aside for another day, when I was inspired to make it out of food storage instead!

Food Storage is so wonderful.  While some things take longer to prepare (dry beans, grinding wheat for bread, etc) other things more than make up for it, like canned meat.   I bottle my own meat, but have a small amount of store bought stuff that I bought to build up my supply in between finding fresh/frozen chicken on sale.  I can't wait for the store bought stuff to be gone...it's not as good as the home canned.  I buy whatever chicken I am choosing to work with (breast/whole/bones/boneless etc..) when it goes on sale and bottle it up in either 1/2 pints or pints.

So....this isn't the exact recipe I got...it's my food storage version of it.  It was very very tasty!

MEXICAN CHICKEN

2 12.5 oz cans of Chicken Chunks (1 1/2 pnt) w/broth
1 pint  Crushed Tomatoes w/juice
1 can Diced Green Chili's
2 Tbs Minced Onion, dry
2-3 Tbs Taco Seasoning

Pour all the ingredients into a pot with their broths and juices.  Break the chicken chunks into shreds and mix all the dry into the broth.  Simmer until enough liquid is absorbed/evaporated to make it a good consistency for tacos or burritos.

I made this into burritos, using 1 1/2 c. dry rice, which I cooked, and opening 1 can of olives and 1 can of beans (kidney or black)  Letting everybody make their burritos and adding a vegetable as a side dish, this recipe will easily feed 6-8 people.  We topped ours with cheese and sour cream since it's not a desperate food storage time yet.  :)  Might as well enjoy it while we can, right?

This would make a great chicken taco salad with tortilla chips and lettuce or a delicious taco. 


I must confess, I completely forgot to take pictures the night I made it, so these pictures are of my leftovers the next day when I warmed them up and served them for lunch.  :)    I think they were tastier the second day!

Tuesday, July 26, 2011

Haystacks

An old standby for my family dinners the Hawaiian Haystack is a versatile meal.  Not traditionally thought of as 'food storage' this family favorite is easy to convert to food storage ready items.  Not quite a recipe, it's more a list of ingredients that you pile together on your plate depending on your current taste and desires.  The amounts listed are for starters to help you along.  These amounts work for feeding 6-8 people.  Items without amounts usually come in a can, just open it and you may have leftovers depending on how much your family likes of each item.

HAWAIIAN HAYSTACK
Chow Mein Noodles (the crunchy ones)
Rice (2 c. dry)
Pineapple, tidbits
Mandarin Oranges
Chilli's, diced
Peas
Olives, sliced
Onions, diced
Coconut
Shredded Cheese**
Meat (1/2 pt)
Gravy (1 1/2 c.) to match meat
Sweet and Sour Sauce


** Cheese is the only item that is not readily food storage compatible.  I urge you to investigate the different options to include cheese in your food storage or just plan on omitting it from this recipe.

Thursday, July 21, 2011

Aphids and Squash Bugs

We have been infested with aphids and squash bugs this year.  Soooo sad!  I just thought I would share some of the remedies that I have been using and how they work.

Aphids

Aphids on my trees, aphids on my bushes, aphids everywhere!  The most effective thing I have found against them is garlic.  I planted garlic all around both my trees and so far it seems to have helped.  A few years ago we had them all over the honey suckle in the front yard and I planted 2 cloves of garlic next to each one and never had a problem since. 

The tree's are more precious to me than the honey suckle so I planted multiple cloves around each tree.  I was fortunate that although I did not plant the garlic until late June, they are already growing.  I think they are helping.

I just need to dig the grass out a little more so my Mr. doesn't whack the tops off when he is trimming and mowing the lawn.  :)

Unfortunately, I believe I now need to add garlic to my whole yard.  I am finding what I believe are aphids less on my trees and more in my flower gardens.

Although I am not a fan of planting for the sake of planting.....I do have a particular soft spot for lilies and lilacs and roses.  As such, my garden with lily bulbs is showing the signs.  I will add the garlic soon.

Squash Bugs
These horrible little creatures serve no purpose, in my opinion, other than to make life difficult.  I cannot see how they may be useful in any way at all.  I have battled them every year for the past 3 or 4 years.
Nasturtiums are said to repel them.  I planted nasturtiums, but still got the bugs. 
The most effective measures I have found is Diatomaceous Earth sprayed on the underside of the plant leaves with a Garden Spritzer.

This looks like a water toy that your kids might want, but a little bigger around and a fancy inside of the tip to evenly dispense a mist of the DE powder.

I alternate this DE spray every 3rd or 4th day with a spraying of Neem oil.  I use a regular 1 gallon insecticide sprayer which was purchased special for the food safe products.  Neem oil is a natural product, and I don't want to be spraying with a residue of Sevin when I am not trying to.

These two methods with handpicking the nasty little buggers off and squishing their guts into the ground seems to be effective.  When it's not, out comes the Sevin.  I prefer non-chemical natural measures of control but not at the expense of my crop or at the risk of infestation the next year because the natural methods didn't work.

One year, I lost 6 huge, full grown and healthy cucumber plants to squash bugs after they finished ravaging my traditional squash plants.  Did I mention I hate squash bugs?

Another method to control these things is to plant a sacrificial crop for them.  Most common is hubbard squash.  When the plant has attracted all the bugs and is starting to be 'infested', pull it up and throw it away.

One year I planted acorn, yellow summer, zucchini, hubbard, pumpkins, cucumbers and watermelon.  For your FYI....the hubbard went first.  the acorn, pumpkins, yellow and zuch were infested next.  The acorn fell to the infestation, but although heavily infested, the yellow and zuch withstood to produce the whole year.  The pumpkin was attacked, but with intense efforts, was manageable and produced.  After the acorn went, the buggers attacked my cukes, which put up a fight and produced, but eventually fell to the bugs.  The watermelon were not touched. 
Our management efforts were the same on all plants.  I believe some plants are a little hardier than others and locations and plant growth features (how dense the leaves and stems are v. being more spread out) made the efforts effective on some plants and not on others.

Thought it was interesting, so I am sharing.  I do recommend not keeping an infested plant in the ground after the infestation is identified.  I recommend pulling and sealing in a garbage bag and sending to the dump.  This experience was the year I learned what I was dealing with and I did not do as I should partly because it wasn't till the end of the year I finally identified the little buggers.  I have had to battle infestation ever since.


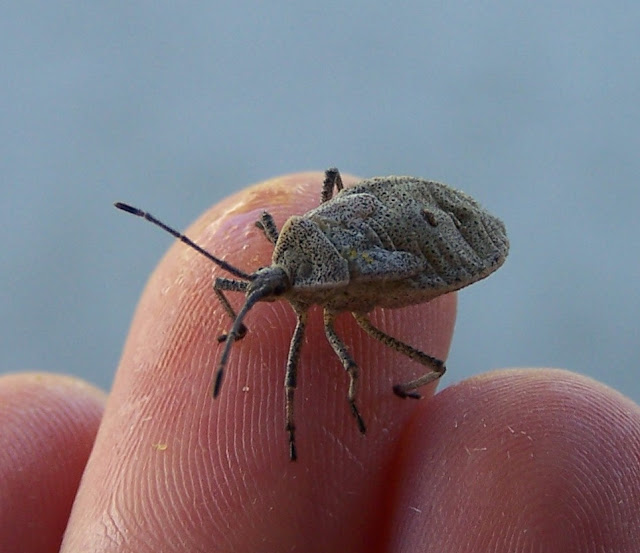
Squash bug, not yet fully ugly adult.  Too close for comfort though.  Pulled off one of my zucchini plants.